SaturnWP Theme Documentation

SKT Themes


Installation

Through Dashboard

  • Log in to the WordPress Dashboard.
  • Go to Appearance -> Themes.
  • Click on Add New Theme.
  • Click on Upload Theme button.
  • Click on Choose File button and select saturnwp.zip then click on Install Now button and wait for the install to complete.
  • After the theme installed successfully, click on Activate button.

Manual Installation using FTP

  • Unzip saturnwp.zip to your Desktop.
  • Use an FTP client to access your host web server. Go to /wp-content/themes/
  • Upload theme to /wp-content/themes/.
  • Go to Appearance -> Themes and activate theme from Dashboard.

Home Page Setup

  • After activating theme on screen comes "Welcome to SaturnWP Theme" popup message which says "Click on the button below to complete theme installation process so click on Complete Installation button.
  • On SKT Templates page simply going on "SaturnWP" and click on More Details button.
  • Import in process which takes few seconds to import.
  • Now page imported successfully in Elementor :)
  • Now closed elementor imported page and back on dashboard Pages.
  • Now assign imported "SaturnWP" page to static Homepage.

FAQ

  • 1. How to set logo in header?
  • Click Here for setting logo in header.
  • 2. How to set sticky logo in header?
  • Click Here for setting sticky logo in header.
  • 3. How to set slider?
  • Click Here to enable slider.
  • 4. How to set logo in footer?
  • Click Here for setting logo in footer.
  • 5. How to set footer columns widgets in footer?
  • Click Here for setting footer columns widgets in footer.
  • 6. How to enable social icons in footer copyright bar?
  • Click Here for enable social icons in footer copyright bar.

General Settings

In these settings you can set things that will have effects on whole your site.

Front Page

If you wish to have as your Front Page something else then blog, then first you need to visit WordPress settings.

To make Front page and Blog work as it should you have to follow this steps:

  1. Go to your WordPress Pages → Add new
  2. Add new page named Home and another named Blog. These names are examples, you can change them.
  3. Go to Settings → Reading → Your homepage displays
  4. Choose "A static page (select below)"
  5. In Homepage: choose SaturnWP
  6. In Posts page: choose Blog
  7. Save changes.

Slider

Accessed in Appearance → Customize → General settings → Slider.

You can set here default theme slider, and custom slider.

Default Slider

Custom Slider

You can set here any slider plugin shortcode.

Disable Slider

If you don't want to use slider so simply click on Disable Slider Button.

General Layout

Accessed in Appearance → Customize → General settings → General Layout.

You can set here general background of site, and custom mouse cursor(christmas cursor?).

Page Preloader

Accessed in Appearance → Customize → General settings → Page preloader.

Page preloader works as a mask for the time while the layout of a page is not ready yet and it(page) is not useful.
It can be useful in some cases, but generally, it is rather an effect than a real feature.
You can set few things about preloader: background color & image, animation and when should preloader fade.

Note:
If you have faulty JavaScript on your page, from some external plugin for example, then your page may freeze on preloader screen.
So if you suspect such thing it is a good idea to deactivate it before debugging.

Theme Header

Accessed in Appearance → Customize → General settings → Theme Header.

Theme header is a place where you usually find the logo of your site, main menu, and a few other elements.
If you do not plan to use theme header or want to replace it with something else, just disable it here.

Footer

Accessed in Appearance → Customize → General settings → Footer.

Footer here you set number of widgets columns displaying in footer, footer logo, copyright content, social icons and privacy policy links.
If you do not plan to use footer or want to replace it with something else, just disable it here.

Footer Socical Icons

Hidden sidebar

Accessed in Appearance → Customize → General settings → Hidden sidebar.

It is only active if it has some active widgets in it you set it from Appearance → Widgets → "Hidden sidebar"

Fonts Settings

Accessed in Appearance → Customize → General settings → Fonts Settings.

Here you can choose fonts for your page. You can set font for 3 main layout elements:

  1. Font for top nav menu, interactive elements, short labels, etc.
  2. Font for Titles/Headings
  3. Font for normal(content) text – text in posts/pages, and other places with a lot of text.

here you using system fonts and Google Webfonts.

Headings

Accessed in Appearance → Customize → General settings → Headings.

Here you set general styles of Headings in theme. Everything should be self explanatory.

Content

Here you will have some settings that apply to main content of pages, posts, generally places with blocks of text. Everything should be self explanatory.

Social Icons

Accessed in Appearance → Customize → General settings → Social icons.

Here you provide links to social profiles that you have.
What you set here will be displayed in the Social Icons widget and other layout places(header, footer) that allow displaying socials icons.
You can drag & drop social items to set them in the order you wish to see on your page.
Only filled inputs will activate each social icon. Not filled = not shown
For e-mail field please use following format: mailto:[email protected]

Lightbox settings

Accessed in Appearance → Customize → General settings → Lightbox Settings.

Here you can set many things about appearance of lightbox used in theme.

Widgets

Accessed in Appearance → Customize → General settings → Widgets.

Few basic settings about general look of widgets in siedbars.

To top button

Accessed in Appearance → Customize → General settings → To top button .

To top button appears when you scroll your page around 100px. It allow you users to quickly scroll to top of your page.
Here you can set few settings about its appearance.

Buttons

Accessed in Appearance → Customize → General settings → Buttons .

Settings for look of buttons. Buttons can usually be found in forms to submit them.

Header Settings

Theme header is as complex part as whole separate layout, so it has its own groups of various settings. You can find all of them in Appearance → Customize → Header Settings

Header is mainly for navigation of your site, but it is also place to establish your brand with logo.

Type, variant, background

Accessed in Appearance → Customize → Header Settings → Type, variant, background .

Here you set sticky version, header variant, header color variant, header social icons and other color options.

Header Layout

It is only active when "Header Layout Two" is selected and if it has some active widgets in it you set it from Appearance → Widgets → "Topbar Left Widget Area" And "Topbar Right Widget Area"

Logo

Accessed in Appearance → Customize → Header Settings → Logo.

Here you upload a logo for your site or use text one.

It is important to have a logo for branding purposes and to keep navigation intuitive, where clicking at the logo brings your user to the home page.
Here you can set Image logo and Text logo

Main Menu

Accessed in Appearance → Customize → Header Settings → Main Menu.

Here you can set everything that is part of the main menu. So colors, font size/weight, separators, opening/closing icons, etc.

Sticky header - Override normal settings

Accessed in Appearance → Customize → Header Settings → Sticky header - Override normal settings.

Here you can set the appearance of a sticky header. It works by overriding settings that are set for the header in its “default” state. So if you won’t set here some setting it will use default setting value(from other panels).

Blog Settings

Accessed in Appearance → Customize → Blog Settings

Here you can set things for single post and blog(and blog alike pages).
You can overwrite here Global settings for page background and title bar.
Here you can also enable filter for blog and set its appearance.

Background

Accessed in Appearance → Customize → Blog Settings → Background

This will be the default background for pages related to the blog.

Post list

Accessed in Appearance → Customize →  Blog Settings → Post list

Settings in here will affect blog, categories/archives of blog and also search result page.
You can set layout, sidebar side, number of columns and other special things like:

  • Type of post excerpts – Setting manual or automatic excerpts for posts. You can read more here. Automatic excerpts will not format post. It means all shortcodes and links will be displayed as raw text. Best to test it by yourself.
  • Display of posts video – if post is using video instead of featured image, then you can decide if video should be displayed or featured image. Featured images make site load faster.
  • Lazy load – Disabled gives classic pagination, and enabled gives two options for lazy loading next items.
  • Custom header sidebar – Here you can overwrite sidebar set in Appearance → Customize → Header Settings → Type, variant, background → Custom sidebar.
  • Display post Media – should featured image/video be displayed
  • Post meta: Date – should date of post be displayed
  • Post meta: Comments number – should link to comments of post be displayed
  • Post meta: Categories – should categories of post be displayed
  • Post meta: Tags – should tags of post be displayed

Post list - Title bar

Accessed in Appearance → Customize → Blog Settings → Post list - Title bar

Here you can set width, variant of title, background image with parallax effect option and there you also enable disable title.

Single Post

Accessed in Appearance → Customize → Blog Settings → Single Post

Settings in here will affect single post layout. Some of these options can be overwritten in each post.
These options are common for both blog list and single post(but can be set separately):

  • Display post Media – should featured image/video be displayed
  • Post meta: Date – should date of post be displayed
  • Post meta: Comments number – should link to comments of post be displayed
  • Post meta: Categories – should categories of post be displayed
  • Post meta: Tags – should tags of post be displayed

Beside previously described options there are additional some, specially for single post like layout, sidebar side, post meta and special options:

  • Author info in post – will display box about author under post content if user description is set. Description about each author can be set in Users menu.
  • Posts navigation – should links to next and previous post be displayed

Single post – title bar

Accessed in Appearance → Customize → Blog Settings → Single post – title bar

Here you can set width, variant of title, background image with parallax effect option and there you also enable disable title.

Shop WooCommerce Settings

Accessed in Appearance → Customize → Shop WooCommerce Settings

Shop settings are only useful if you use WooCommerce plugin.
Here you can set things for single product, shop & shop connected pages.
Beside this there are settings for shop buttons and Pop up basket from Tools icons located in header.

Background

Accessed in Appearance → Customize → Shop WooCommerce Settings → Background

These options will work for all shop pages - product list, single product and other.

Products list

Accessed in Appearance → Customize → Shop WooCommerce Settings → Products list

Settings in here will affect shop, shop categories/archives and also search result for shop.
You can set here various things about shop layout and how listed products will be presented.

  • Note:

  • Lazy load – Disabled gives classic pagination, and enabled gives two options for lazy loading next items.
  • Custom header sidebar – Here you can overwrite sidebar set in Appearance → Customize → Header Settings → Type, variant, background → Custom sidebar.
  • Search in products - If your main focus on your site is Shop then here you can switch default search function, to search in shop products instead of posts & pages.
    You can do it with option Search in products instead of pages.

Products list - Title bar

Accessed in Appearance → Customize → Shop WooCommerce Settings → Products list - Title bar

Here you can set width, variant of title, background image with parallax effect option and there you also enable disable title.

Single product

Accessed in Appearance → Customize → Shop WooCommerce Settings → Single product

Just basic settings about layout of single product page.
Theme thumbnails options is more for compatibility, as in recent WooCommerce version they have changed how thumbs are displayed. We advice to disable this option in case of issues.

Single product - Title bar

Accessed in Appearance → Customize → Shop WooCommerce Settings → Single product - Title bar

Here you can make Single product - Title bar enable/disasble and also there is an option for Title position

Other Shop Pages

Accessed in Appearance → Customize → Shop WooCommerce Settings → Other Shop Pages

Settings for cart, checkout, order received and my account pages.
Settings here will affect such shop pages:

Other Shop Pages - Title bar

Accessed in Appearance → Customize → Shop WooCommerce Settings → Other Shop Pages - Title bar

Settings for cart, checkout, order received and my account pages. Here you can make Shop page - Title bar enable/disasble.

Pop up basket

Accessed in Appearance → Customize → Shop WooCommerce Settings → Pop up basket

When WooCommerce is activated, button opening this cart will appear in tools icons in header. There also have to be some active widgets in Basket sidebar for this.
Here you can set basic settings of its appearance.

Check below screen for setting "Basket Siderbar" Widgets.

Buttons

Accessed in Appearance → Customize → Shop WooCommerce Settings → Buttons

You can change here the colors of buttons used in the shop. Alternative buttons colors are used in various places in the shop.

Page Settings

Accessed in Appearance → Customize → Page Settings

Settings here are connected to static pages.

Single Page

Accessed in Appearance → Customize → Page Settings → Single Page

Here you can set things for static pages. You can overwrite here Global settings for page background.
Also you can set global setting(for pages) for layout, sidebar and title-bar.
Most of these settings can be overwritten on each page in Page details.

Single page - Title bar

Accessed in Appearance → Customize → Page Settings → Single page - Title bar

Here you can make Single page - Title bar enable/disasble and also there is an option for Title position

404 page template

Accessed in Appearance → Customize → Page Settings → 404 page template

In theme there is defined 404 error page template that is called when non existing page/post is requested.

Password protected page template

Accessed in Appearance → Customize → Page Settings → Password protected page template

In theme there is defined Password protected page template that is called when passworded post is requested.
Theme have default styling for such situation, and you can change background image for this page.

Menus

Accessed in Appearance → Menus

Creating Site Navigation

If you don’t have any menu yet you will have to first create it:

  • Click Create new menu as shown on screen shot below
  • Provide name for it
  • Click Create Menu button

When you have your menu ready, scroll to Theme locations and mark menu as Site Navigation

Creating One Page menu

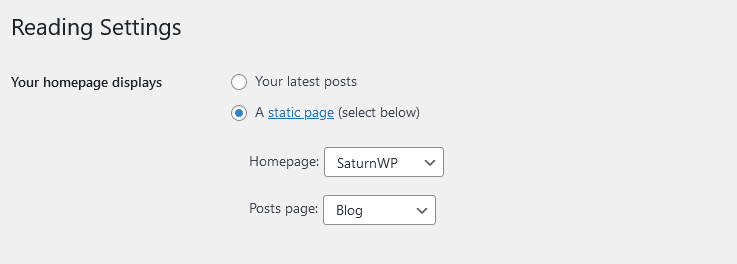
When you are using SaturnWP theme to create One Page site, you often will want to create menu that links to specific sections on your site.

  • To do it you will have to use anchors, it means links that looks like https://sitename.com/#home – most important is part #home

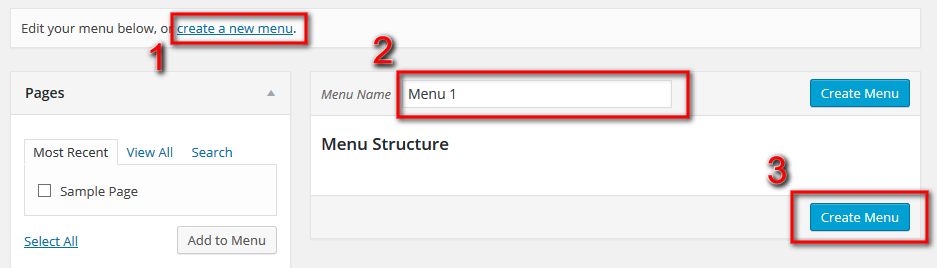
Adding anchors in menu

You could add your links just as anchors alone like #home however then if you will have some sub-page, like Blog, and it will display same menu, then this links will not work.
It will not work cause you probably will not have same sections as on your front page.

Cause of that safest way to add anchors to main menu is to use absolute links it mean links with your domain and anchor. Example https://sitename.com/#home
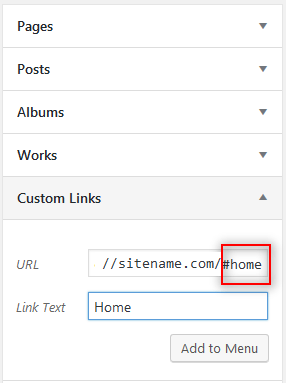
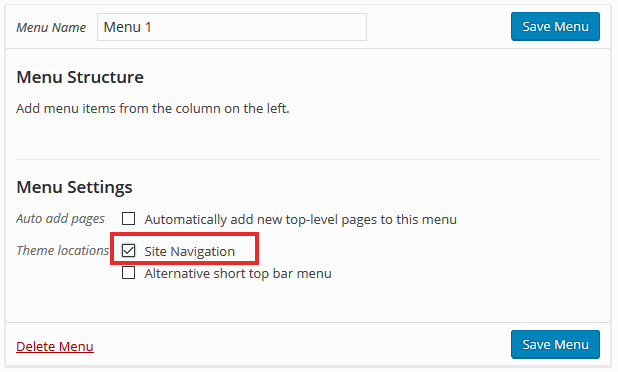
How to add anchor

Open Custom Links option, and enter there whole link and Link Text. Click Add to Menu.

Custom CSS

Accessed in Appearance → Customize → Custom CSS

Here is good place for inserting small CSS changes to theme layout. You wont loose this CSS while updating or deactivating theme.

Copyright © 2021 SKT Themes